Nest.js microservices via NATS
Let's create a basic nest.js microservices apps using nats to communicate them.


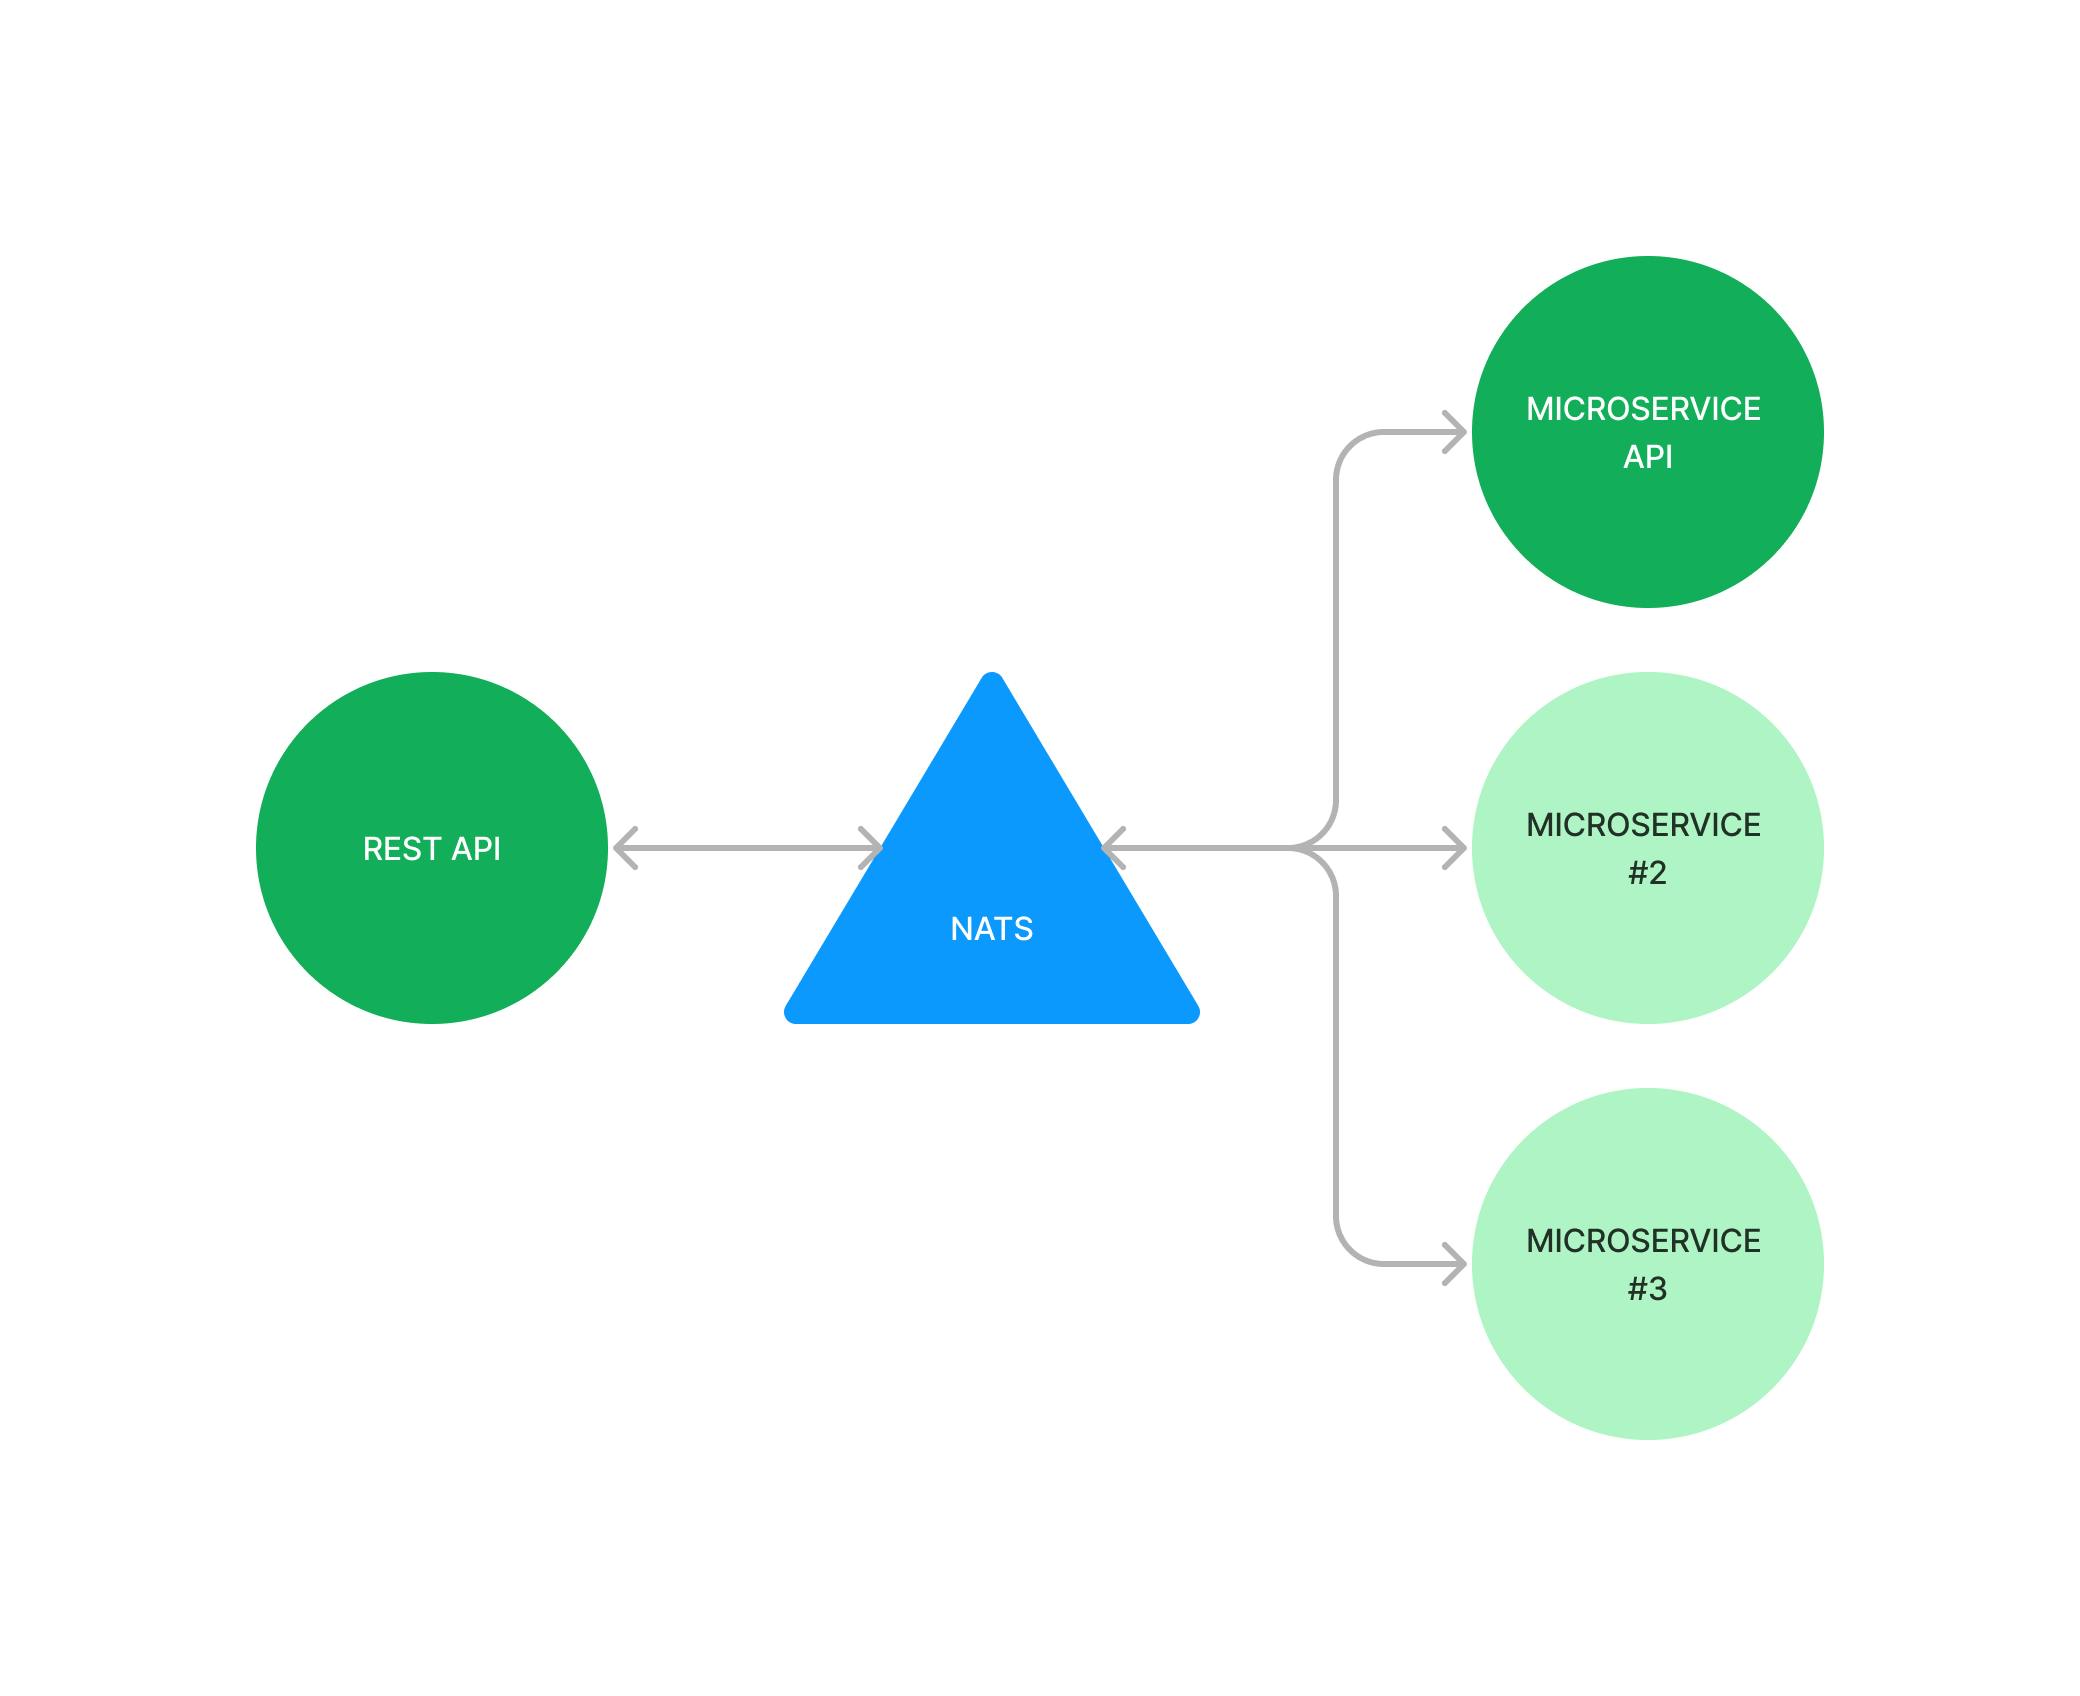
A new practice is here, we are going to communicate 2 nest microservices using NATS as a transport layer. But, what is NATS? Well, it basically allows us to connect apps similarly to TCP. Nest already provide wrappers for these types of communication. Here you have the official NATS docs.
With a bit of context the plan is as follows:
Run NATS service via Docker
Create a nest hybrid app that will receive HTTP requests and also performs as a microservice one.
Create another nest app which only works as a microservice, it will receive requests from the hybrid one.
Create and run NATS service with Docker
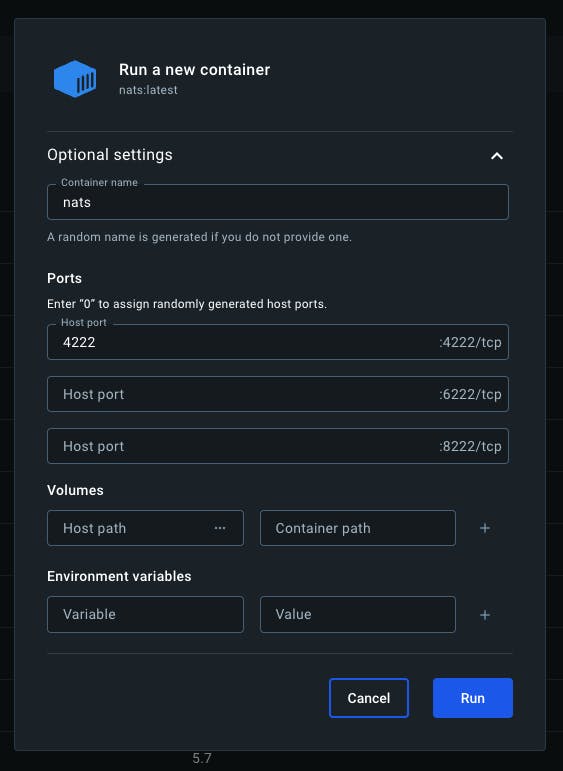
In docker desktop SEARCH and RUN for the NATS image

Define the container name as nats, and the host port as 4222, then RUN.
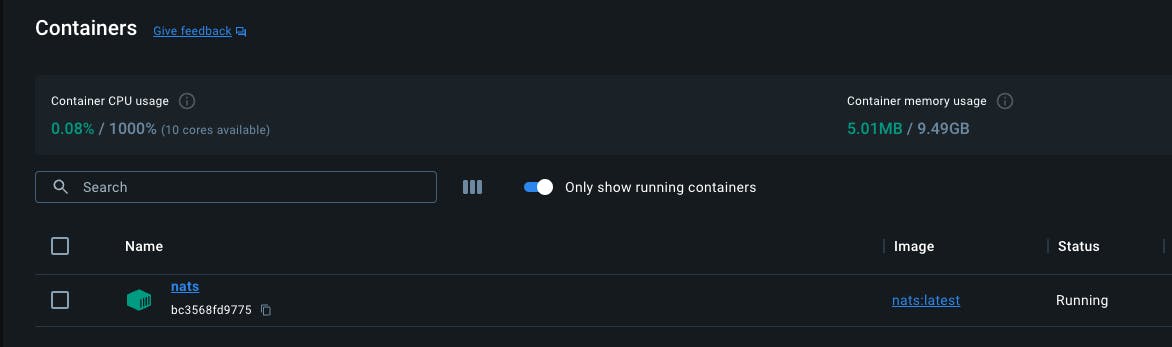
You should have a running nats container locally
Create a nest hybrid app
Summary: We will create a new nest app, then we need to install required dependencies and apply the proper configuration so our app can server http and microservices requests. These are the steps:
nest new hybrid-app
npm i --save nats dotenv @nestjs/microservices
npm run start:dev //just to make sure your app is running
Now that our app is running we will create a nats module with the proper nats configuration. The next command will allocate a src/nats/nats.module.ts and also will update the src/app.module.ts
nest g module nats
Our new module should be prepare as follows, make sure to be imported and exported:
import {Module} from '@nestjs/common';
import {ClientsModule, Transport} from "@nestjs/microservices";
import * as process from "process";
import 'dotenv/config';

const natsClientModule = ClientsModule.register([
  {
    name: 'NATS_SERVICE',
    transport: Transport.NATS,
    options: {
      servers: process.env.NATS_SERVERS
    }
  }
]);

@Module({
  imports: [natsClientModule],
  exports: [natsClientModule]
})
export class NatsModule {}
Create a nest microservice app
Summary: We will create a nest app, unlike the hybrid this will only functions as a microservice. The configuration is a bit different and this app will also needs to be connected to the nats server in order to dispatch data.
nest new microservice-app
npm i --save nats dotenv @nestjs/microservices
npm run start:dev //just to make sure your app is running
Now you need to create a .env file with the nats server address:
NATS_SERVERS="nats://localhost:4222"
We are ready to start with the microservice configuration. These changes should be applied to your src/main.ts
import {NestFactory} from '@nestjs/core';
import {AppModule} from './app.module';
import {MicroserviceOptions, Transport} from "@nestjs/microservices";
import 'dotenv/config';
import * as process from "process";

async function bootstrap() {
  const app = await NestFactory.createMicroservice<MicroserviceOptions>(
    AppModule,
    {
      transport: Transport.NATS,
      options: {
        servers: process.env.NATS_SERVERS
      }
    }
  );

  await app.listen();
}
Unlike the hybrid app we don't need to specify a PORT when listening the app. Also, we use the function "createMicroservice" with additional transport configuration.
Once done, head to the src/app.controller.ts and modify the @GET route for a @MessagePattern({cmd: 'hello_world'}).
import {Controller} from '@nestjs/common';
import {AppService} from './app.service';
import {MessagePattern} from "@nestjs/microservices";

@Controller()
export class AppController {
  constructor(private readonly appService: AppService) {
  }

  @MessagePattern({cmd: 'hello_world'})
  getHello(): string {
    //return this.appService.getHello();
    return "Hello from microservice!";
  }
}
This will be the route we are going to reach from the hybrid to the microservice app.
Creating a microservice resource in Hybrid-app
Now that our microservice app is ready, we need to connect our rest api with the microservices' route ({cmd: 'hello_world'})
In our hybrid app let's edit our src/app.controller.ts as follows:
Inject
ClientProxyinstance which is our communication "bridge" with the microservice routes.Our
getHellofn is performing a "send", which means it will wait until we receive the expected result from microservice. The 2nd parameter is for the payload we need to send.
import {Controller, Get, Inject} from '@nestjs/common';
import {ClientProxy} from "@nestjs/microservices";

@Controller()
export class AppController {
  constructor(
    @Inject("NATS_SERVICE") private readonly client: ClientProxy
  ) {}

  @Get()
  getHello() {
    return this.client.send({cmd: 'hello_world'}, {});
  }
}
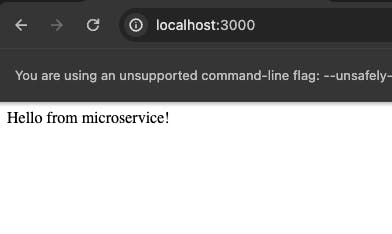
Once everything is in place, run both apps, open the localhost:3000 (or the port you specify in the hybrid's .env) and you should be able to see the microservice response.
🙉 Bonus: Create an exception filter to know when microservices are down!
Let's say one of your services is down and you'd like to have a standard error message to quickly know what went wrong. For this escenario nest allows us to create an exception filter. Create the file src/exceptions/rpc-filter-exception.ts
import {RpcException} from "@nestjs/microservices";
import {ArgumentsHost, Catch, ExceptionFilter} from "@nestjs/common";

@Catch(RpcException)
export class RPCCustomExceptionFilter implements ExceptionFilter {
  catch(exception: RpcException, host: ArgumentsHost) {
    const response = host.switchToHttp().getResponse();

    const rpcError = exception.getError();

    if (rpcError.toString().includes('Empty response')) {
      return response.status(500).json({
        status: 500,
        message: rpcError.toString().substring(0, rpcError.toString().indexOf('(') - 1)
      });
    }

    response.status(400).json({
      status: 400,
      message: rpcError
    });
  }
}
With the above config we are filtering the common error Empty response. There are no subscribers listening to that message ("{"cmd":"anything"}") when the microservice is down. It can also be used to filter error responses more properly when the service is up and the errors are being caught.
Head to src/main.ts and enable the filter by adding the next line:
async function bootstrap() {
  ...
  app.useGlobalFilters(new RPCCustomExceptionFilter());
  await app.listen(process.env.PORT);
}
That's it! Now you know an alternative to TCP communication with Nest.js. There are many more things to do, such as adding request validation and enabling it on microservices (which needs more configuration). Handling observables is also slightly different. And what about setting up an environment for the entire app? We have only just begun to explore what we can do. The next part is coming soon, so stay tuned!